8 Simple Steps To Create A Beautiful Lily Drawing – How To Draw A Lily
Creating A Nice Drawing In Eight Easy Steps
Here, we explain in eight easy steps how to draw a lovely lily drawing with a fun time! With this simple and fun method of learning to draw, you and your kids will become real artists!
Drawing a lily is not a simple mission, but it is not too difficult; you will concentrate on the course drawing to finish the task in each step.
Besides details instructions, you can refer to the illustration in eight steps.
It takes about 30 minutes to finish all missions here, and if you have experience learning to draw and draw, you may be familiar with learning to draw and will complete the task of drawing lily flowers sooner.
How To Draw A Lily – Let’s Get Started!

Lily usually appears in early summer and lasts until autumn. They come in many colors, and each color represents a different meaning; for example, the pink lily represents admiration. Lily is orange for confidence.
Because lily flowers are beautiful and appear worldwide, they are loved by many people and drawn by many artists.
Learn to draw lily to have a great leisure time to help you balance life.
It would help if you prepared some supplies such as a pen, pencil, marker, or crayon and a sheet of paper before starting to draw a lily.
You will start drawing a lily flower with pencil and paper; you will be able to erase the wrong lines and draw again until you are satisfied with the image. Once everything is done, you will choose the suitable colors for your drawing.
With this lily drawing guide, you can enjoy lily coloring pages to practice your drawing and coloring skills and have a great time.
In learning to draw, you can stop to observe with our reference image to visualize and continue drawing later.
Drawing and coloring will help you a lot in life; you can enjoy this activity in your free time after hard-working hours.
Right now, let’s get going into eight steps on how to draw a lily.
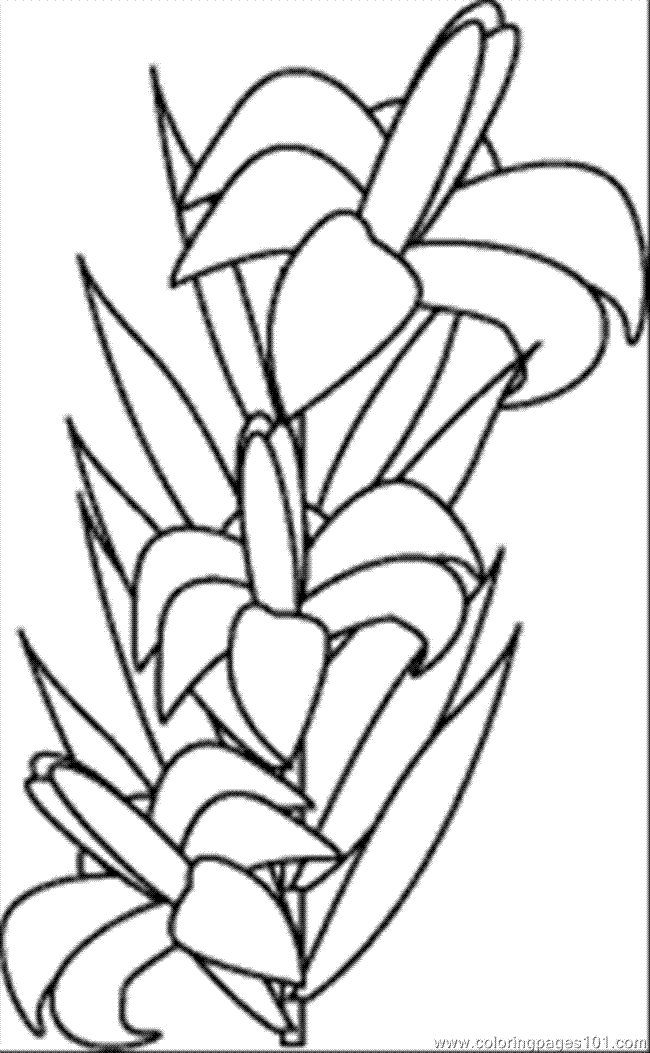
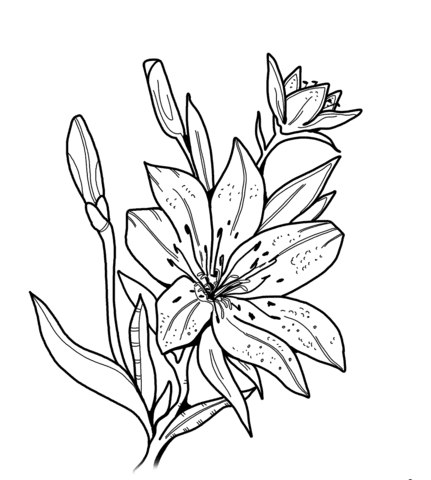
Step 1 – Draw The First Two Petals Of The Lily

Begin by drawing two petals for your lily drawing. You draw two curved lines that meet at a point to form a branch for your lily flower.
Your task when drawing two petals for the lily flower is exactly the same. You will draw an upper petal and a lower petal of your lily flower, as seen in our reference image.
Step 2 – Keep Continue Drawing Two Petals Of The Lily

Your task in this second step on how to draw a lily is to add two petals of a lily.
Similar to your work in step 1, you will draw two curved lines for each petal and finish your task.
It’s simple for you, and it takes minutes for this task before moving to the third step.
Step 3 – Draw The Fifth Petal

You continue to draw the petal for your lily flower. So, you finish five petals for your lily drawing.
You also use curved lines to create the form of this flower.
Step 4 – Draw The Sixth Petal Of Your Lily

Similar to the task of the previous step, you have to draw the sixth petal for your flower drawing.
As you can see in our illustration, this petal is in the space between the two painted petals.
You can finish the task here and come to the next step now.
Step 5 – Draw The Stamen of Your Lily

You complete all six petals of your flower, and it’s time to create its stamen.
At the center of the lily drawing, you draw the stamen created from the small straight lines.
Step 6 – Now, Create Two Buds

You draw two bubs on both sides of the lily, as seen in our reference picture.
You continue to use the curved line for this task.
Let’s finish your work quickly and move on to the next step.
Step 7 – Draw Stem And Some Leaves For Your Lily

Moving forward to the other parts of the lily, you use two parallel lines to create a stem for the lily.
You use two curved lines for each leaf, and we must draw three pointed leaves here before going to the last step for coloring.
Step 8 – Color Your Lily Flower

That brings you to the final step now. You have to choose the suitable for your drawing product.
There is no limit on colors, so you are free to choose. However, you will have to choose the right color for your product’s natural color. Green for leaves and stem and some colors such as pink, red, or yellow for lily flowers.
You can refer to our illustrations to make your images nicer.
Your Lily Drawing Is Completed
You finish off your drawing and coloring mission on how to draw Lily. It is interesting for everyone, especially kids.
If you are a parent, you can give this activity to your children; they will enjoy drawing after the hour at school for entertainment. Moreover, drawing will help them develop acting skills and avoid using technical devices.
Children will be more focused, know how to hold a pen, recognize colors, and think creatively in this drawing activity.
On our website coloringcool.com, you can enjoy some other flower drawing similar to lily drawing such as magnolia drawing, pansy drawing, peony drawing or sunflower drawing. We regularly update our “How to Draw” option, so don’t forget to keep checking back to enjoy brand-new drawing tutorials continuously.
You also can enjoy coloring pages or blogs for 100 % free at our website.
Hopefully, you understand everything now, and you get a great time here!