7 Simple Steps To Create An Awesome Parrot Drawing – How To Draw A Parrot
Create a lovely Parrot in Seven simple steps
Our easy parrot drawing guide is great for both beginners and more experienced artists alike, so grab your drawing tools and let us try it out. You have seven steps equivalent to seven missions that you have to pass. You will follow our instructions and illustration in each step and realize your task. Your task here is not simple but not too difficult as long as you focus on the process of learning to draw; I also hope you like our tutorial and come back here for more drawing tutorials. The parrot is a beautiful colorful bird, and there are a lot of people who love it. Do you like parrots? If you love this bird, then you are on the right track for choosing us. I hope you have a good time with us in this parrot drawing tutorial.
How To Draw A Parrot – Let’s Get Started!

The parrot, also known as psittacine, is a brightly colored bird that is commonly kept as a pet bird. Parrots have about 350 different species of parrots, but they have one common feature that is colorful, small curved beaks and four-toed feet, …In this easy-to-follow tutorial, we take you through all the essential steps in creating a realistic parrot drawing. We begin by covering the essential elements of a parrot, using construction shapes and lines to build the basic shape. We will then move on to creating the final outline, adding textures, and finally creating realistic coloring. All you will need is a pen, pencil, marker, or crayon and a sheet of paper before starting to draw a parrot. Then you will use a pencil and draw on A4 paper. You can erase wrong strokes and redraw until right. In the end, you will choose the right color to color your parrot. You follow our tutorial step by step and make a beautiful parrot; accompanied by this parrot drawing tutorial will be parrot coloring pages that you can use to practice your drawing and coloring skill. Let’s go into seven steps to create a complete parrot drawing!
Step 1 – Draw the Parrot’s Head

To begin drawing a parrot, it is always a good idea to begin construction with its exciting head. You can use some curved lines to draw a beak that composes the bottom beak and the top part of the shape. After that, you show its head with some curved lines, too. Please don’t forget to draw an eye for the parrot with a black circle. You will draw the thick pointed clumps of feathers to add texture! This helps make the parrot appear more realistic.
Step 2 – Draw The Parrot’s Body Outline

Your task in this second step of our guide on how to draw a parrot is to draw its body outline. Simply in this work, from the parrot’s head, you use two curved lines to form part of its body. You will continue drawing parrots in the third step right now.
Step 3 – Draw The Parrot’s Wings Outline

You will stretch from the stroke in the second step to form 2 outline wings, as you see in our reference image. This step task is also simple; it takes you a few minutes to complete the task. Once you have replicated the lines as they appear in our reference image, you’re ready to move to step 4!
Step 4 – Finish Off The Parrot’s Wings

You will finish drawing beautiful wings for parrots. You continue to use the zig-zag curve to draw feathers on the parrot’s wings. You can observe our illustration and follow it. Your task made to be easiest for this step.
Step 5 – Finish Off The Parrot’s Tail

It’s time to draw the tail for the parrot of our tutorial on how to draw a parrot. From the parrot’s wings, you will draw long wings and create a tail for parrots; it’s simple, isn’t it? You can look at our pictures and follow them. Once you are happy with your image, you can go to the next step to continue realizing your task of parrot drawing.
Step 6 – Finish Off Your Drawing Mission

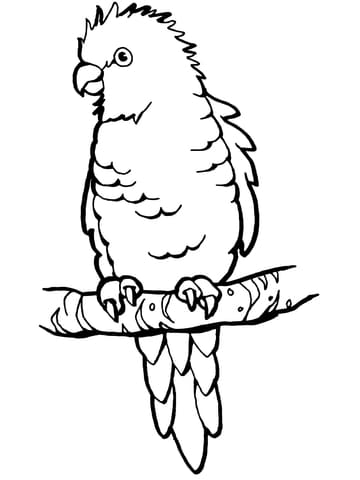
You will complete your drawing mission on how to draw a parrot in adding a branch with some leaves that make the parrot sit on it. It is easy to work; you draw an addition under your parrot, then at the top of the department, you will draw some more leaves; this detail helps your image appear more realistic. Before going to the final step of coloring the parrot, you can add a few details to make the picture more beautiful.
Step 7 – Color Your Parrot

You will choose the suitable colors for your parrot. As mentioned above, parrots will have colorful feathers, so now you can select the right color to make your parrot more beautiful. We have mixed many colors for our parrot drawings: yellow for the beak, red, green, blue, and yellow for the wings and tail. With brach, you can choose green.
Your Parrot Drawing Is Complete
You create a complete parrot drawing in the seven easy steps. Right now, you can admire your result. This is interesting work, and if you are a parent, you can this activity for your kids and enjoy it together. Drawing and coloring activities can help your kids to avoid using some technical devices such as television. Smartphones, tablets,…they are not good for your eyes and evolution. More, by joining in this activity, you feel more comfortable, and your life is better. Well done for finishing your easy and realistic parrot drawing! We hope that you have enjoyed the drawing process and learn a lot from it. On our website Coloringcool.com, you can enjoy many drawing guides related to birds such as blue jay drawing, hoopoe drawing, crane bird drawing,…you can use them to practice your drawing and coloring skill. Have fun with parrot drawing!