7 Simple Steps To Create An Agile Spider Drawing – How To Draw A Spider
Create A Scary Spider In Seven Simple Steps
In this step-by-step today’s tutorial, we will be showing you how to create a spider drawing. This one isn’t scary at all, and you’ll master it in no time. This is our only spider drawing tutorial in 7 steps; you will have seven tasks to complete as soon as possible to have fun. It’s fantastic, and you will have a great time with us; it takes about 30 minutes to finish drawing the spider. If you get good at it later, you can draw the spider 30 minutes faster. This task is not easy but not too difficult, and we arrange it from easy to difficult; you need to focus on drawing by following our instructions and illustrations.
How To Draw A Spider – Let’s Get Started!

Spiders are creatures with eight legs; they live everywhere, in the house, in clothes, under the bed, in the garden, … today there are some people who keep spiders as a pet and take care of them carefully. Do you find spiders scary, or do you love this creature? And today, you have the opportunity to learn to draw spiders. Moreover, by drawing this creature, you also have the opportunity to understand more about it and get more information about the type of spider. Before you start drawing spiders, you need to prepare a pen, pencil, marker, or crayon and a sheet of paper. You will then proceed to draw the spider by sketching it with a pencil. Then you will erase the wrong lines and highlight the correct lines. Once you get a complete spider drawing, you will choose the suitable colors for your spider. Included with this drawing tutorial, you can enjoy spider coloring pages for free on our website and practice your drawing and coloring. Now, we will go to seven steps on how to draw a spider!
Step 1 – Draw Spider’s Body And Head

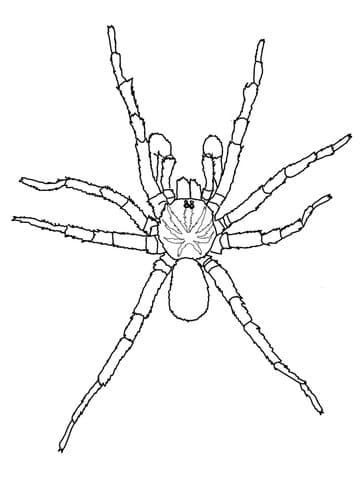
Starting to draw a spider, you will show its body and head. You will draw the head and body as you see in our reference. You create an oval for the head and an oval for the body. Please don’t forget to add the pincer for your spider. It’s simple here, and you spend some minutes on this task before moving to the second step.
Step 2 – Draw The First Leg For Spider

As you know, a spider has eight legs around its body, so you must draw eight legs for your creature. Each spider has 3 4 leg segments, so you will also draw the spider’s legs in 3 to 4 segments, as you see in our illustration.
Step 3 – Add More A Leg For The Spider

If in step 2 you draw the right leg for the spider, in this third step, you draw the left leg for it according to your vision. Just like the leg that you drew, this leg you draw is also simple; you can observe our pattern and follow along. Once you are pleased with your image, you can continue your drawing mission in the fourth step.
Step 4 – Keep Adding Some Legs To Your Spider

Your task in this step of our guide on how to draw a spider is to add in two slightly curved legs just underneath the front left leg you drew in the previous steps. These ones will be a little shorter than the front legs, so be sure to closely look at the reference pictures to get the various lengths to look accurate. You finish these legs before moving to the fifth step.
Step 5 – Draw More Two Legs On The Right Side

You will draw two legs that are symmetrical to the two legs you drew in step 4; the length of the legs and the distance are also the same two legs. So your task in this part is completely similar to step 3. You can quickly finish the work and move on to the next step.
Step 6 – Draw In The Last Two Legs

In this step of our instruction on how to draw a spider, you’ll be finishing off the legs of your spider drawing. It is also divided into parts, with the ones at the end being a bit shorter than the other segments. So, your spider has eight full legs for two sides, and each side has four legs, as we know. Right now, you can also draw in some final details. You can add some decoration details to make your spider more realistic before going to the last step for coloring.
Step 7 – Color Your Spider

It’s time to choose suitable colors for your spider. You can use any color you like for your spider drawing. We take yellow, mixing black and red for our image; you can refer to it. And what color do you use for your creature? You can show your product on Facebook or Pinterest for everyone can see.
Your Spider Drawing Is Complete!
You finish your drawing and coloring mission on how to draw a spider. How do you feel? Did you have a good time with our spider drawing tutorial? I hope you have understood everything now. If you like our spider drawing guide, you can recommend your friends and your relatives to come here. You also can give this instruction to your kids; they will surely like it. Drawing and coloring can help your kids to avoid some technical devices such as television, tablets, and smartphones,…they are not good for their eyes and evolution. On our website Coloringcool.com you can enjoy some cute creature drawing guides such as grasshopper drawing, caterpillar drawing,…Like the spider drawing guide, they are very interesting, and you get a comfortable time with us. Have fun with the spider drawing!